


For more than six years, Coun. Jim Stevenson sent letters to countless politicians, led hundreds of presentations and met with officials anywhere he could to garner support for a project he believed was important for a growing Calgary.
There were days he believed the whole thing would fall apart, as he faced opposition from council colleagues and struggled to convince provincial counterparts to see the value an airport tunnel would bring to the city.
On the weekend, the Ward 3 councillor finally saw the hard-fought and controversial build come to fruition. Standing in the eastbound lanes of the $295-million tunnel on Saturday, Stevenson – along with Mayor Naheed Nenshi, Calgary Mackay-Nose Hill MLA Dr. Neil Brown, and Calgary Airport Authority board chairman David Swanson – celebrated the roadway’s grand opening with thousands of Calgarians in attendance.
Past foes of the project who argued the underpass shouldn’t get built said, amid the celebration, that residents should recognize the city faces many years of empty coffers as it deals with more pressing transportation woes down the road. But on Saturday, the crowds snapped photos of Lamborghinis, Ferraris and other fancy cars at a show and shine, lined up for snacks at the food trucks, and were serenaded by live bands at the opening day party that gave members of the public a chance to visit the tunnel on foot before it opened to traffic at 5 a.m. Sunday morning.
Stevenson scanned the structure with great satisfaction. “This is pretty exciting,” he told reporters. “I just felt there had to be a way, if something is right and you believe in it, you just keep pushing for it.”
On Sunday, when the airport tunnel opened to traffic early in the morning, Ed Tanas lined up at around 5 a.m. to be one of the first drivers through. He posted a dashboard video of his trip on Twitter, under the handle @calgarykiaguy.
 Tanas described driving through the tunnel as “awesome,” “neat” and “fun.”
The six-lane, 620-metre roadway – built beneath the airport’s new runway – connects Airport Trail between Barlow Trail and 36th Street N.E. and is meant to link the east and west parts of the city. It’s estimated the tunnel will have 15,000 users daily. Council approved the project in February 2011 and five months later, excavation began. Stevenson said there is still years of work yet to be done.
Former alderman and mayoral candidate Bob Hawkesworth, who campaigned against the tunnel, said the city will pay an even bigger price for “burying” close to $300 million on the project when it’s looking for cash for the next leg of the LRT and other big ticket transit projects.
“There’s a lot of more important projects that are going to go unfunded for a number of years as a legacy of this tunnel at the airport,” he said on Sunday. “I don’t think anybody in the provincial government looking at that priority is going to rush to write a cheque to Calgary city council, for the things they want money for….” For now, the road dead-ends at 36th Street as the city cannot extend Airport Trail farther east to Metis Trail until it helps finance interchanges that will lead into the airport terminal.
But the plan is to ultimately connect Stoney Trail east to the Centre Street alignment. The LRT will also eventually run through the tunnel. Stevenson acknowledged it may be difficult to see the impact the tunnel will have on the city as it stands today.
“But when we add another 50 to 60,000 people on the other side of that stoplight (east of 36th Street) and we create another 40 to 50,000 jobs all around this airport, that’s when this is really going to be important,” he said. “Today, it will help us. But in the future, it will be necessary.”
The mayor touted the roadway as a “remarkable feat of engineering,” which he proudly reminded the public was completed “on time and on budget.”
“It had to be built to very specific specifications because of what’s on top of it. The runway that’s on top of this is not a road, it’s almost like a giant skyscraper that’s tilted on its side,” Nenshi said. “The new runway is almost the length of from City Hall to Heritage Drive, so think about that.”
Swanson, Calgary Airport Authority’s board chairman, said the tunnel will benefit the airport and those who work at and use the facility, which continues to grow and had 14 million passengers pass through last year.
By Clara Ho, Calgary Herald
Renovations and Improvements
Correct Diameter for a Ceiling Mounted Fixture or Chandelier…
Many clients ask: How do I determine the Correct Diameter for a Ceiling Mounted Fixture or Chandelier in my space?
There are a few formulas which you can use that are very simple:
A) MEASURE the WIDTH of the ROOM in FEET, multiply x 2 and convert to INCHES and add 4.
Your result will give the you the MINIMUM required diameter to hold the scale of the space.
A Lighting diameter chosen above this MINIMUM requirement will add even more drama and impact to your room.
For EXAMPLE: for a 10 foot room x 2 = 20 convert to inches plus 4 = 24 INCHES is Minimum diameter for your new fixture.
We believe it’s a great design decision to go above the Minimum requirement even if its just slightly larger. This is an opportunity for you to add some real excitement to a space!
If you choose fixtures that do not meet the minimum requirement this can make the whole room feel “off” and even boring.
B) MEASURE the room, adding the LENGTH and the WIDTH together in FEET and convert the result to INCHES.
Fox EXAMPLE: a 10 x 12 FOOT ROOM: add 10 + 12 = 22 INCHES.
Overall Height of your Lighting:
The correct Height to Hang your fixture, obviously this depends on where you are placing your Lamp, what the usage will be of that room, and whether its to be over a Dining Table or not.
For Ceiling Mounted Fixtures to be placed over a Dining Room Table: the average Height above the table is 30 – 34 INCHES.
Check out at www.luminosodesign.com for handcrafted lighting choices in SILK or MURANO GLASS. They will also assist you with any Customization Requirements (plus they drop ship worldwide!)
Donna – Luminoso Design
Are you fit to sell? Top 5 mistakes sellers make…
Everyone wants to take advantage of the housing market when it comes to selling your home. Unless you are buying and selling strategically for investment, the best time to sell is when your existing home does not meet your current or future needs.
A key factor to consider is the economy. The economic health of a country affects many factors related to real estate. Mortgage rates are often influenced by the state of the economy. A higher interest rate may encourage you to stay with your current home as the increase in mortgage payments may change your financial situation. A lower interest rate may mean that you can upgrade to a larger home with a minimal impact to your current mortgage.
Keep in mind that holidays and weather may impact the sale of your home. Winter holidays and the peak summer season keep many potential buyers busy and not looking for homes. Buyers with school-aged children often choose to move during the summer to minimize the challenges with changing schools in the middle of the year.
Click here or on the image below to see a video about the top 5 mistakes home sellers make:

Red and Blue and Green all over…
Calgary homeowners have a new high-tech tool to help them save money and reduce their impact on the environment.

Aimed at improving urban energy efficiency, the HEAT (Heat Energy Assessment Technologies) project visualizes the amount and location of waste heat leaving homes and communities by using thermal imaging.
By showing homeowners where their homes are wasting heat, how much it’s costing them, and how to fix it — all on Google Maps and all for free – the tool can help residents improve their home’s energy efficiency, save money and reduce greenhouse gas emissions.
Led by U of C professor Geoffrey Hay, the project was chosen for the $10,000 grand prize at the MIT CoLab Conference over 400 submissions from more than 30 countries in 20 competitions.
“HEAT’s mission is to integrate leading edge geospatial technologies and key behavioural science findings to show what urban energy efficiency looks like, where it’s located, what it costs and what to do about it,” said Hay. “We believe that if people could see the waste heat they generate and if they knew how much it cost financially and to the environment that they would take action, and we want to show them how.”
The HEAT maps show grades ranging from red to blue (hot to cold) that represent differences in the amount of wasted heat leaving residential buildings, with blue representing a relatively waste-free home and red representing a home where waste heat is high. Homes are also given scores ranging between 0 and 100, which helps compare one or more houses.
By clicking on an individual home, users of the site can also see where heat is being lost in the home and even what the estimated financial and equivalent carbon dioxide (CO2e) savings per year would be.
Currently, the HEAT pilot project has gathered information on 37,914 homes in northwest Calgary, although the intention is to map the entire city.
“By scaling up the heat consumption results from 37,000 Calgary homes to the full city of Calgary with over 330,000 individual singledwelling residences, we estimate total municipal savings (for natural gas) of $33,564,386 and a reduction of 198,216 tonnes of CO2 per year,” said Hay.
Typically escaping through poorly insulated doors, windows, walls, ceilings, ductwork and electrical fixtures, waste heat represents expensive heated air that is leaving a home, instead of staying and keeping the house warm.
Interestingly, Calgary’s newer neighbourhoods ranked worse than older communities under HEAT’s rankings. With an average ranking of 25, Dalhousie was the “coolest” community in the city while Patterson was the “hottest,” with an average score of 73.
In Canada, buildings account for 35 per cent of all emitted green house gasses (GHG), generate 10 per cent of airborne particulate matter, 33 per cent of Canada’s total energy production and 50 per cent of Canada’s natural resources, of which the majority is used for space and water heating.
For Calgary home inspector Kevin Sixsmith, the ability for homeowners to visualize inefficiencies in their home is a big step forward.
“This type of tool is always good as people act quicker when they can visually see that there may be a problem or that improve their homes and save money,” said Sixsmith. “People are slowly learning the importance of how homes are built so they may save energy which in turn save themselves money.”
Comparing the energy efficiency of their future homes is just one of the new tools available to homebuyers. Along with hiring a REALTOR®, homeowners can now browse listings that come complete with professional photos and video. The power to virtually walk prospective neighbourhoods via Google Street View and criteria such as Walk Scores can help educate buyers about the area without ever leaving their home, while EnerGuide ratings, available through CREB®’s HomeSmarts website: www.creb.com/homesmarts help them better understand how to save money.
“The additional information available to REALTORS® through programs like HomeSmarts enables them to customize the home buying experience and meet the expressed needs of their clients. If energy efficiency is a priority for a client, HomeSmarts enables a REALTOR® to meet that need,” said CREB® Member Services Manager Lisa Roberts. “Connecting with the University of Calgary on the HEAT initiative is another way for us to expand our view of what energy efficiency looks like for REALTORS®.”
– See more at: http://www.crebnow.com/red-and-blue-and-green-all-over/#more-6170
Mold Prevention!
Get Rid of Mold for Good!

Mold is an essential and healthy part of any natural ecosystem, but when mold appears inside your home, that’s another matter. Mold growing inside any part of your house is ugly, unhealthy and surprisingly common. That’s why every homeowner should understand basic indoor mold control know-how. Here are the six steps you need for effectively dealing with the mold in your life and making sure it doesn’t come back.
Step#1: Assess the Situation
Begin by revealing the full extent of mold growth in the affected area. This could be easy or difficult depending on how much wall, carpet or ceiling you need to tear away. That said, investigation is a step that’s significant for more than obvious reasons.
Mold authorities in Canada and the U.S. say that homeowners can tackle indoor mold issues themselves, but only if the affected area is no larger than 30 or 40 square feet.
Anything bigger is probably a job for a pro. Professional help is also strongly recommended if your situation involves sewage backup. Bacterial contamination poses its own threats that go beyond mold hazards.
Step#2: Eliminate the Moisture Source
Mold is always associated with moisture in some way. Without moisture, mold can’t grow on anything. With sufficient moisture mold can grow almost anywhere. This is why a permanent mold solution always involves creating dry conditions. Liquid water leaks are easy enough to spot, but moisture vapour and condensation can also be a hidden source of trouble. Basements are especially susceptible to water vapour infiltration through masonry walls and floors, and ventilation is not always the answer. See Musty Basement Management to understand when to open windows and when to keep them shut.
Step#3: Make Removal Decisions
Some moldy surfaces are ideal for treatment and restoration, while it’s easier to remove and replace others. Drywall, ceiling tiles, carpet and other non-structural materials should usually be removed, bagged and discarded. Wear a HEPA-rated respirator when removing moldy materials because mold spores will become airborne. Structural and otherwise costly-to-replace areas can be treated.
One often-overlooked source of mold contamination comes from the common practice of storing cardboard boxes on basement floors. Even seemingly dry basements can allow enough moisture vapour to migrate up through the concrete to trigger mold growth on cardboard. That’s why you should never store anything organic directly on a concrete basement floor.
Step#4: Dry the Area
After eliminating the source of moisture, you may still have wet conditions that can lead to trouble. It is essential to create dry conditions before mold treatment can succeed. Air circulation, heat and a dehumidifier are the three most powerful drying tools. You’ll get best results if you monitor the relative humidity of the air in the space with a hygrometer, allowing more or less outside ventilation to speed drying, depending on outdoor temperature and humidity conditions.
Step#5: Kill Mold and Discourage Re-growth
This is where common practice is actually a mistake. While bleach is an acceptable way to kill mold on hard, non-porous surfaces, it can’t do a good job on surfaces that are even a little bit porous. Roots are the reason why. All molds send root-like structures called hyphae into porous surfaces to gather nutrients, and surface tension prevents traditional bleach and water solutions from penetrating deeply enough into wood or concrete to kill the hyphae. Bleach will cause a superficial mold kill in situations like these, but the mold remains established below the surface, ready to return with a vengeance. Also, as toxic as bleach is at first, it actually offers no residual protection when new mold growth starts because it dissipates as a gas.
This is why there are alternatives that are better than bleach when it comes to breaking the mold cycle. Non-bleach products sold as fungicides that carry Health Canada registration have been proven to work by independent testing, and this designation is something you should look for when choosing anything to kill mold. An effective product is Concrobium Mold Control. It’s a liquid that kills mold and mold spores by mechanical action, physically crushing all parts of the mold organism as it dries. This mechanical action explains why a non-toxic product can still kill mold and prevent re-growth if the area occasionally does become moist again. The product remains in place too, providing residual action to kill mold.
Step#6: Prevent Mold Re-growth
Even registered fungicides that offer residual mold control aren’t magic. Ultimately you need to keep moisture levels down to eliminate an eventual mold relapse, and this means different things in different situations. Ensure sufficient ventilation to keep indoor relative humidity at or below 50 per cent during winter, and constantly be on the lookout for roof leaks, water coming in the basement or chronically leaking taps or pipes, especially in hidden places like behind the washing machine or under a kitchen counter.
Not all molds are harmful, but how can you tell the dangerous from the innocent? This is why controlling mold is an important homeowner skill that’s as much about household management as it is about what products to use to kill mold. Keep things dry, remove mold food sources, then understand how to treat areas properly if mold ever does show up. Your home will look better and you’ll be healthier.
Outdoor Mold
Indoor mold is a visual and health issue, but outdoor mold is all about how something looks. Mold can grow on wood decks, composite decks, siding, eaves and just about anything else. Here’s how to clean up mold staining outdoors and prevent it from coming back.
Remove dirt, leaves, twigs, mats and anything else that might give mold shelter from the fungicide you’re using. Treat the area with a yard-safe mold stain cleaner. Concrobium makes one of the only bleach-free, non-toxic house and deck wash products for external mold applications. It comes in a spray bottle for connecting to a garden hose and dousing large areas. It’s won’t harm plants, lawns, pets or anything else it comes in contact with.
Remove persistent stains that remain after initial wash.
Eliminate nutrients. Although you can’t always keep outdoor surfaces dry enough to discourage mold on the moisture front, you can do everything possible to reduce the surface nutrients that are also essential for mold growth. Sweep leaves and grass clippings off your deck or verandah, and keep exterior wall surfaces free of cobwebs, bird droppings and anything organic.
Remove Mold Stains
It’s one thing to kill mold, but it’s another thing to remove stains left by mold. Traditional treatments for removing mold stains include chlorine bleach, hydrogen peroxide or oxalic acid, and while these options do reduce or eliminate staining, they also bleach surfaces and make them uniformly light. In tests I’ve conducted, Concrobium Mold Stain Eraser gets rid of mold staining without scrubbing, and it doesn’t bleach underlying surfaces.
Musty Basement Insights
While it’s true that fresh, outdoor air can be a powerful cure for mustiness and mold, it can also be a powerful cause of trouble. It all depends on the temperature and humidity of outdoor conditions compared with your inside space. This most often becomes an issue with cool basements in summer. When hot, humid outdoor air is allowed to enter a basement, the air cools down, and it loses some of its ability to hold moisture as it does. This is why opening basement windows in summer always causes relative humidity to rise in a cool basement, not drop. Ventilating your basement is a good idea when outdoor temperature and relative humidity is the same or lower than your basement space.
Eliminating Window Mold
Window frames are the most likely place you’ll see mold in your home, and that’s because of our cold Canadian climate. As interior glass surfaces become cold in winter, they trigger condensation of moisture from the warm, indoor air. Anything more than a little moisture on window frames will lead to the growth of black and grey mold, even on synthetic window frames. Removing this mold is simple and easy, and using the right fungicide will also prevent mold re-growth to an extent. The long-term fix is to reduce household humidity levels during winter, and you can’t beat a heat recovery ventilator (HRV) for making this happen. Manufactured by a handful of different companies, HRVs draw fresh outdoor air inside, while exhausting stale, moist indoor air outside. Most of the heat from this indoor air is retained, so it’s more efficient than just opening a window. Dehumidifiers can’t reduce wintertime humidity levels enough to prevent window condensation, so an HRV is the ideal way to control window moisture in today’s tighter homes.
by Steve Maxwell, Homes and Cottages
Winter Garden Dreaming

It’s not the busiest season in the garden but at the job site, one garden business is so busy right now no one is allowed to take a day off until after Christmas.
Despite their name, BC Greenhouse Builders Ltd. in Langley B.C. is a small family-owned greenhouse construction business. Selling home and commercial greenhouses right across North America, the company is shipping a huge greenhouse to Saskatchewan the day I arrive for my tour in early October. In Calgary, Garden Retreat near Chinook Mall has their sample home-greenhouses on display and it’s a nice place to go and dream on a cold winter day.
Yes, it is the season for dreaming and gardeners everywhere are dreaming about plants they could have grown if only! If only it didn’t freeze outside in May. If only it didn’t hail in July. If only there was a bit more heat in September. A home greenhouse might erase a gardener’s worries.
Sadly, small home greenhouses can also be trouble. They can overheat if placed in a south-facing location with no overhead trees or shade cloth. With Calgary’s brilliant sun, greenhouse plants can otherwise go from perfect to scorched in just a few hours. A passive venting system or electric fan also helps remove hot air.
At SAIT, an in-house designed and built demonstration greenhouse uses the latest technology to cool the summer greenhouse and insulate it in the winter, The cost of this bubble insulating structure is hard to estimate because it is a prototype with several innovations, but it is at least double the cost of a regular greenhouse because it has two layers and a bubble generator system.
Typically the insulating value of any greenhouse is very low. It is possible to add a bit more insulation by using 5-wall polycarbonate plastic – a product suggested by Kyle Exner of BC Greenhouse Builders for cold climate growing. The old glass greenhouses of the Victorian era look romantic, and the twin-wall polycarbonate is more common, but the 5-wall system gives more R-value than either.
If frost is threatening, plants will be okay indoors but if there is a deep frost, most greenhouses need a heating system to keep plants happy. I found this out the hard way after my tomatoes froze in late May when temperatures dipped to minus 8 degrees outdoors.
So it isn’t the busiest season in the garden, but it is a time for research and planning and dreaming. Imagine what you would do with a home greenhouse of your own?
by Donna Balzer on Nov 25, 2013 – See more at: http://www.crebnow.com/winter-garden-dreaming/#sthash.SetVYLV4.dpuf

Container Gardening is fast becoming a genre unto itself. Everything from flower boxes and vegetable boxes to containers for water gardens to hanging baskets and herb baskets to strawberry containers. There are many varieties of plants suitable for container gardening and many kinds of containers to plant them in. Like any kind of gardening, there are two steps: 1) The planning and dreaming stage; the call from deep within to get better acquainted with everything natural and green, the many ideas that might include colour and beauty or maybe a desire for healthy local food, and 2)The practical doing step of assembling some strategies for garden success. Strategies for successful container gardening include choosing appropriate soil materials, developing watering and feeding strategies and learning about pruning methods to keep your containers looking their best. Container Gardening is an effective part of a whole garden scheme or a complete and delightful garden by itself. Click here to read more!!!
Calgary Apartment Construction Lagging
Casting light on Calgary’s current rental crunch, a new report shows there were fewer purpose-built apartments built in Calgary than in any other major city in Canada between 2006 and 2011.
As shown in the report released by the Altus Group, there were only 800 purpose-built rental apartments built in Calgary between 2006 and 2011. The number places Calgary last amongst the markets surveyed for rental apartment construction. During the same period, Montreal saw the highest level of purpose built apartment construction, with 16,000 units built, while the next lowest level of rental construction came in Ottawa, where 1,100 units were added.
During the five-year period in the survey, Calgary’s population went from 991,759 to 1,090,936, an increase of 99,177. In the same span, Edmonton added 1,300 purpose-built rental units while posting a population increase of 81,829.
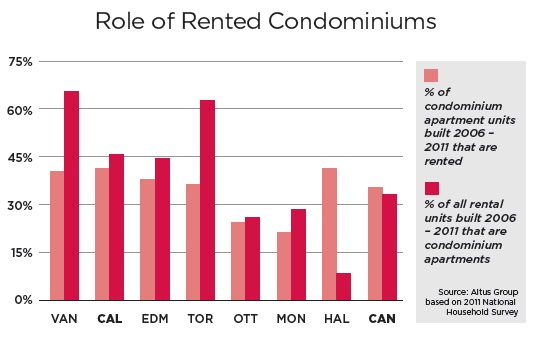
“New units in condominium apartment projects outpaces units in purpose-built rental apartment buildings by about three to one in 2006-2011,” stated the report, which took information from the National Household Survey conducted during the 2011 Census of Canada.
Demonstrating the demand for rental units in the city, the report showed 41 per cent of the condominium apartment units built between 2006 and 2011 ended up as rental units, while 46 per cent were owner occupied.
Of the 10,700 condo apartment units constructed in Calgary during the period, only 3,800 were in buildings higher than five storeys. In Toronto, where 61,000 apartments were built, 55,000 were in buildings higher than five storeys.
Other findings in the report showed nearly one million Canadian households were in need of “major” repairs, roughly seven percent of the country’s housing stock. Defined as problems that “compromise the dwelling structure or the major systems” of the home, 17 per cent of homes built before 1920 were need of major repairs compared to just one per cent of recently built units.
Also detailing the make-up of the average Canadian household, the report showed the average household size for those living in newly built homes was 2.7 persons for owner occupied units, while the average size for those in rental units was an even 2.0 persons.
by Cody Stuart on Nov 20, 2013, CREBNow
Top 10 Ways to Improve Your Homes Salability…

Click on the video above to see how you can improve your home’s salability!
Going Green: Tips on staying efficient in the colder weather

Fall Tips
As the leaves start to fall and summer comes to an end, we know it’s only a matter of time before winter’s chill returns. Take time to prevent heat loss, while getting ready for the winter season to come, with these tips:
- An easy way to detect drafts is to hold lit incense sticks near potential leak locations (preferably during windy days). Leaks will be indicated by smoke movement and possible increased glowing of stick tips. Once identified, use the proper material to seal these leaks.
- To maximize the energy savings in your attic, a minimum level of insulation of R50 is recommended in Alberta. Maintaining proper levels of insulation in the attic will keep your house warmer in the winter.
- Be sure to position your thermostat where it is not affected by heat and draft sources such as direct sunlight, hot air ducts, appliances, stairwells and outside doors.
- An un-insulated and poorly sealed basement can result in up to 35 per cent of your home’s total heat loss.
- Replacing your doors with insulated steel or fiberglass doors will reduce heat loss and can also add to the security of your home.
- Install and use a programmable thermostat. Once it is set, this device can automatically reduce the temperature setting while you are away during the day, or sleeping at night.
- Turn down the temperature! For every one degree Celcius you consistently set back your thermostat during the entire heating season (based on eight hours per day), you could save approximately two per cent of your annual space heating costs.
- You can reduce heat loss through your external wall electrical outlets, light switches, and lighting fixture receptacles by installing foam gaskets behind these outlets and switches. Be sure to switch off any electric power prior to completing this work.
- Apply plastic film to your windows to reduce air leaks. Products designed for this purpose are sold in most home improvement stores and are easily applied using a hand-held hairdryer.
For more household energy-saving advice, visit our Energy Fact Sheets and Tools and Calculators sections.
(Source: ATCO Energy)

Want to know what impact you are making on the earth? Check out your ecological footprint here (via Global Footprint Network)
Planning kitchen appliances…
Whether involved in an existing kitchen renovation or designing a new kitchen it can be very overwhelming for our clients. It is definitely a process and breaking it down will become more manageable resulting in an enjoyable experience and fulfilling your client’s expectations. As a designer, I have worked on many kitchen projects and have been consistent in my approach. There are two key considerations which should be addressed prior to starting: the design aesthetic and the function.

Encourage your client to compile a wish list along with an inspirational file to help them explore their style. This exercise helps to determine if they want their kitchen to be contemporary with modern clean lines, traditional with architectural detailing, rustic which is warm and casual or perhaps industrial with a commercial kitchen appeal. There are clients that want to showcase their appliances to achieve that “WOW” factor. For example, an industrial kitchen may boast a three to five foot professionally styled stainless steel range and hood and refrigerator with full double glass doors displaying its contents. Alternatively, for clients who want a seamless look, their fridge, dishwasher, wine cooler and ventilation can be integrated into the cabinetry. Contemporary kitchens will take this direction with built in ovens, warming drawers and microwaves that are flush with the cabinets. Another appliance that lends itself to this minimal look is the induction cook top with no visible cooking elements and now available with invisible controls when turned off. One manufacturer is introducing built-in ovens with a handless design and a colour LCD touch panel which eliminates all the hardware to further blend into the cabinetry. In addition, integrated refrigerators are now available with an internal water dispenser instead of having it located on the exterior door panel.
Once the design direction has been decided, you can then address the function. The kitchen is the nucleus of the home and serves as a gathering place for family and friends throughout different times of the day. Lifestyle is a key consideration and the first thing to address is how your client’s family operates. What activities do they perform in the kitchen, what type of cooking and how often is this function performed on a daily basis and the type and frequency of their entertaining, if any.
Once you have a clear understanding of your client’s requirements you may want to consider the following appliances. Warming drawers that keep food warm until it’s ready to serve. Double built-in ovens that allow for baking a pie while at the same time the roasting of the main entree. If your client entertains for larger gatherings or has a larger family, then the addition of a second dishwasher will be beneficial for faster clean up. Wine coolers are available in many sizes and have single or dual temperature controls for both red and white wine plus refrigeration zones for other beverages. There is also an option available to add a humidor to the wine cooler for perfect humidity control. Coffee systems can be built-in and create perfectly brewed coffee, cappuccino and lattes and are also available with a hot water dispenser for tea. Steam ovens are gaining popularity with their combined steam, refresh, thaw and baking functions. Remember, considering your client’s cooking methods and lifestyle will determine which appliances are best suited for them. At this stage it is important to consult with your client and an experienced sales associate at one of the appliance galleries that work seamlessly with designers. This is their field of expertise and their knowledge is invaluable.
Once the appliance selection has been completed, you can then decide on their placement based on how they relate to each other relative to their function. The challenge here is to incorporate the desired appliances from your client’s wish list into your kitchen plan. Particularly in smaller kitchens, addressing the maximum performance of the appliances vs. disturbing the balance of storage and overall functionality is so important. A speed oven that offers combination cooking with a fully functional oven and microwave may be well suited for this situation. If your client loves to demonstrate their cooking skills then locating the cook top on an island may provide the perfect stage for guests to gather around and watch their meal unfold. Whether the cook top is located on an island or within cabinetry, there should be plenty of space on either side for dishes and food preparation and within close proximity to the built-in oven. The dishwasher should be close to the sink for ease in loading as well as the refrigerator for washing produce before storing. Having counter space next to the refrigerator provides a touch down area when retrieving food items.
The feeling of satisfaction when my client is ecstatic about their new space and their expectations have been fulfilled is the best. By following the process and listening to your client’s requirements you can make it happen too!
Jane Dolyny, DQ (Design Quarterly)
Jane Dolyny, principal of Dolyny Design, is a residential interior designer with more than 20 years experience. She also has worked on hospitality and corporate design. jane@ dolynydesign.com